Every once in a while, I like to photograph a painting step by step, to analyze my technique. I paint in a color after color process, not mixing colors on the palette, but layering them on the canvas. I’ve decided to share this self-analysis process here in the form of a painting tutorial, to show you how I do it. The subject of this tutorial is my favorite artist, Diane Arbus.
Perhaps you’d like to follow along and try my technique out for yourself.
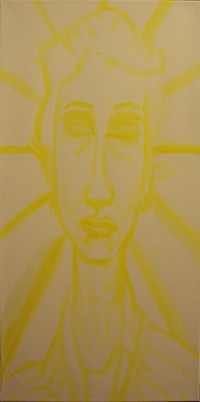
Step 1 – Yellow Outline
Yellow is almost always my choice for the initial color, as it is the lightest. The first step is sort of like drawing the ghostly soul of your subject. The point here is not perfection, or even much accuracy really, but just to get a very rough idea of your dimensions. This color will practically be completely covered up anyway. Its sole purpose is to get you started so that the next step, the solid outline, will be easier to visualize and thus come out more accurate.
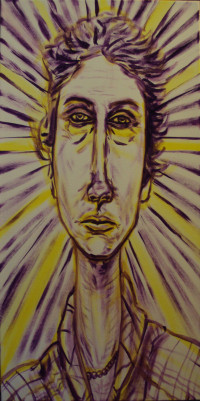
Step 2 – Violet Outline
Violet or purple tends to be the color of choice for my initial solid outline. However, depending upon which color I intend to flood the subject with (skin color), I sometimes go with Hooker’s Green. This is a very important step, as the important thing here is to get the dimensions accurate so you don’t have to waste time correcting them later on. You don’t want to overdo the detail, but you do want to get enough detail so that the framework is there for you later on. Outlines and some basic shading are sufficient. Too much effort here can be a waste of time, because the next step is your flood color, where you’ll be covering this up anyway.
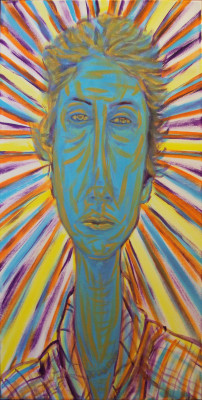
Step 3 – Light Blue Flood
Blue, light blue that is, makes the ideal skin color for Diane Arbus, given her solemn, sombre demeanor. In this flood color step, the best color choice can vary wildly, depending upon the mood and skin pigmentation of the subject. Light green, yellow, orange, red, and even violet or dark blue can be good choices. Orange and light blue tend to be particularly good choices for light skinned subjects. Another thing to note is that it’s generally better to use secondary colors (green, orange, violet) before primary colors, because these get largely covered, but layers of primary colors in later steps will recreate these secondaries for better color balance.
Even though this step may look like you’ve ruined that beautiful violet outline, know that it’s for the best at this stage. Your portrait wants a lot of color, and violet shades will be coming back before it’s all said and done.

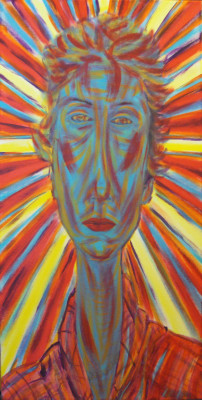
Step 4 – Orange, for Structure
Orange is a good color to use early on, and if not for actual skin color as in this case, it can provide good underlying structure. Here it compliments light blue so nicely, being approximately the same brightness, at the same time drowns out the blue a little bit. This is very quick step, just getting some more color in there. Also, notice that I used a darker orange in the background. The background is becoming quite loud already, but I plan to flood it with white in the end, so this is just what I want at the moment.
Step 5 – Red Blush and Flannel Flood
Red is the obvious choice for the blush color most of the time, but it doesn’t necessarily have to be. Notice that red over the blue creates shades of violet. I used some pretty thick red here, as it’s still early on and I want it to remain bold even if lots of it gets covered or blended. I also use red to flood her flannel and to fill in the background.
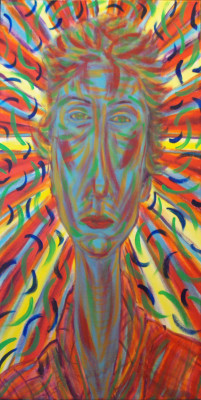
Step 6 – Light Green, for Subtlety
Green is ideal for a shading color, which I most often opt to use it for, but in this portrait I decided to go with light green instead, to add more color. Of course I could always add dark green later too, but in this case I decided that one shade of green was enough. I use light green here to flood her eyes, which were green in real life. It blends subtly with the light blue skin, and I overlay the fiery background with gentle green strokes.
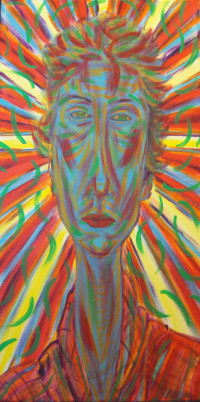
Step 7 – Dark Blue, Finalizing Background Texture
Dark blue, or indigo in rainbow terms, is next up to bat. In this case I decided that the subject herself has enough color, but I need to finish the background before I can begin shading her in. I simply add blue strokes to the overlaid green to finalize the underlying background texture.
Step 8 – White Background Flood
White completely drones out that overly distracting background, which was the plan all along. Suddenly the background goes right back to where it started, except with a subtly colorful pastel effect. Now we can get to the subject of the portrait.
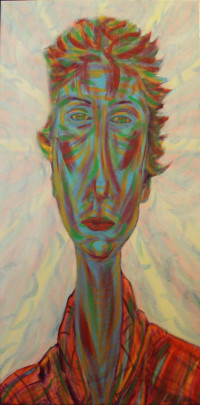
Step 9 – Violet Shading
Violet is reintroduced here, as the early layer had been almost completely covered. Outlines are gone, which is good because outlines are not realistic. Of course you don’t have to go for realism and can bring them back if that’s your style. My style is semi-realistic; despite its stylization, it maintains a certain level of realistic detail.
In any event, this layer is where you want to bring in some deep shading. Notice how this really brings the figure back into solidity. The hair starts to come alive too. Normally I’d probably take the shading to the next level with Hooker’s Green, blending more smoothly to a more realistic look. However, in this case I decided that violet alone is sufficient. Green over violet makes a quick dive into deep darkness, which is great for expressive effect.

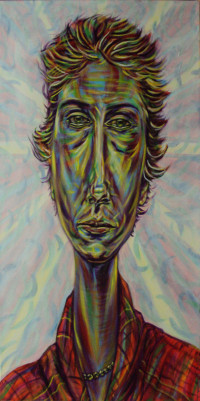
Step 10 – White, Preliminary Highlights
White in this step was not actually necessary, that is, if you have a strong enough yellow to cover what’s under it. Cheaper yellow paint is too translucent to do this, but if you have some good expensive heavy body yellow paint, skipping this step is certainly an option. Anyhow, the point of this step is to make way for the initial yellow highlights, which should be a little larger than the final white highlights.
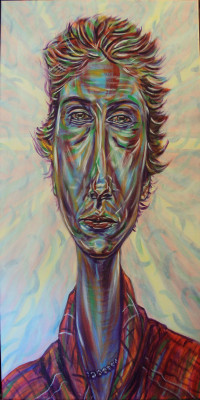
Step 11 – Yellow Early Highlights
Here we go again, coloring right over the last layer with yellow this time. Yellow is a natural highlight color, which I always use for this effect. The only thing left to do at this point is re-whiten some of this yellow, lest your subject appear to be sitting under a blaring spotlight.
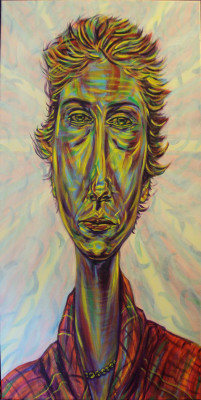
Step 12 – White Highlights
White, in this final step, is used not to cover too much of the yellow, but to focus upon the very brightest areas. You probably don’t want too much white, since this creates a more glazed look. With the commencement of the final highlights, we end up with a colorfully expressive, yet deep and detailed figure.
All Finished :)
There we have it. You can check out the painting here, along with a previous study using the same reference photo. I hope you found my painting technique interesting. Maybe you’ll even want to give it a whirl. I use the same basic technique whether I’m doing figures or landscapes, and have used it in a few different styles as I developed my skills. I’m a self-taught artist.